Are you a planner nerd? Can you spend hours perusing planners, analyzing the layouts and extra pages? Trying to find the perfect combination of function and beauty? I can, and have, spent HOURS! If I can just find the perfect planner then all the plans I put into it will get done, right? If that’s you, you’re in the right place. Read on to discover innovative ways to decorate your planner, add custom pages, and infuse creativity and your personal style into your daily planning routine.
Finding the right base planner
As I was searching for a new planner at the end of last year, I knew I wanted to be able to decorate and customize my planner in a way that didn’t require a tedious or complicated setup each week. I wanted to set it up one time at the start of the year and then each month’s pages to be ready and waiting to be filled in as the months rolled around. I also knew I wanted to use my own artwork, and I hoped to be able to reuse any custom pages or elements I created in future years.
Things to consider
Choosing a base planner will depend a lot on your personal preferences for the size and layout of the actual weekly and monthly pages, but here are some additional things to consider:
Color on the pages –
Do you have artwork or special papers of your own you’d like to add? If so, consider how the planner colors and theme will mesh with the color or images you’ll be adding. I did not want the planner I purchased to have any color as it would compete with my own artwork.
Month dividers –
Do you prefer tabbed dividers, or will you be adding your own? Consider how monthly dividers could be added or the existing ones altered.
Built-in planning prompts –
If you’d like to add your own planning or journaling prompts, consider how they will flow with those included with the planner, or if those planner pages could be removed.
Extra pages –
Are there any blank or lined pages at the back for additional notes, journaling, or artwork?
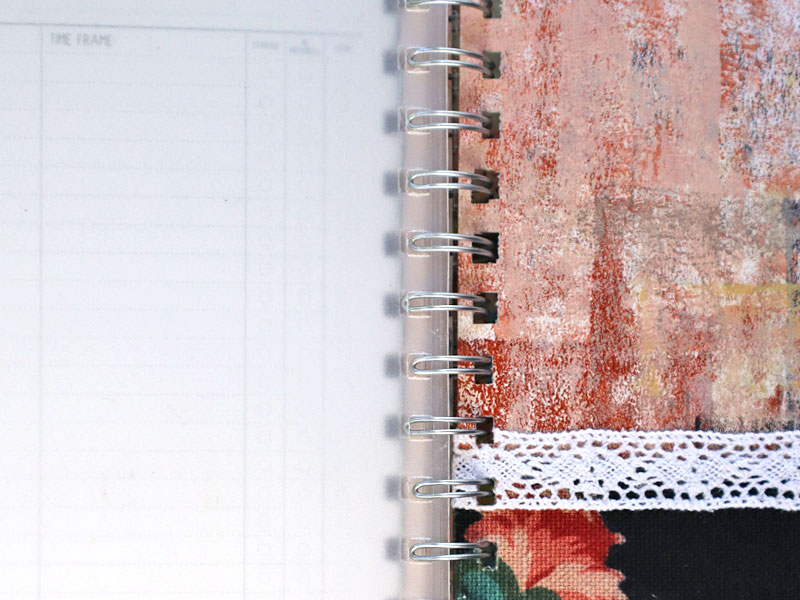
The binding
The method for adding new custom pages to your planner will depend on the type of binding. To add a new page on it’s own, you’ll need to look for either a spiral or disc bound planner. Here’s a tip!!! – For either style, save the old cover or a torn out page. You can use it as a template if you need to mark where holes should be punched on your new pages.
Spiral bound –
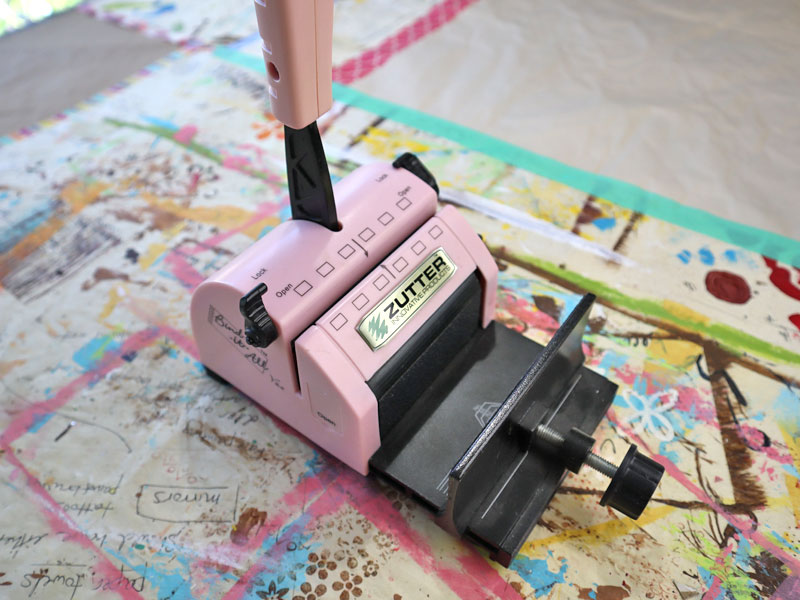
To fit your new pages onto the wire binding, you’ll typically need to punch either square or rectangular holes. You can use a hand-held square or rectangular hole punch to do this, or a binding system such as the Zutter Bind-It-All (more details below).
Disc bound –
The holes for disc bound bound planner can be punched with a regular circular hole punch, or there are special punches just for this purpose like this multi-hole mushroom shaped hole punch.
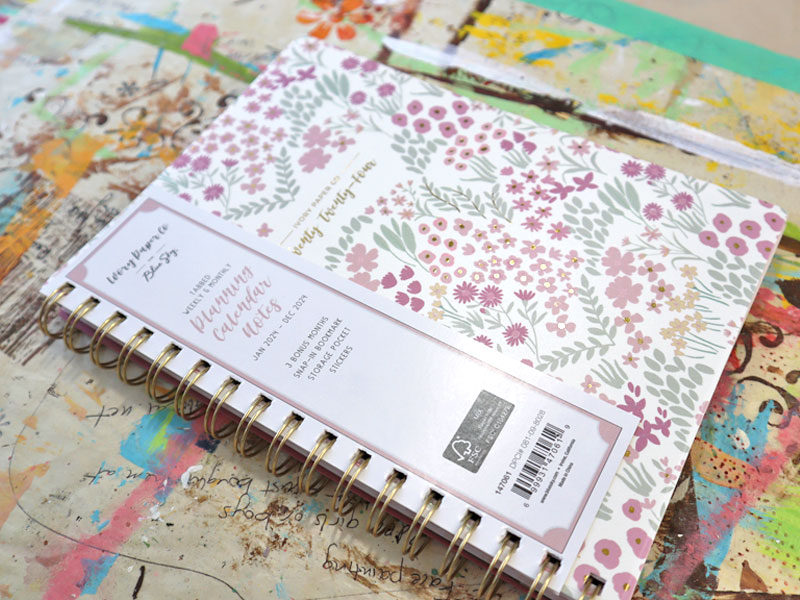
The perfect planner for me
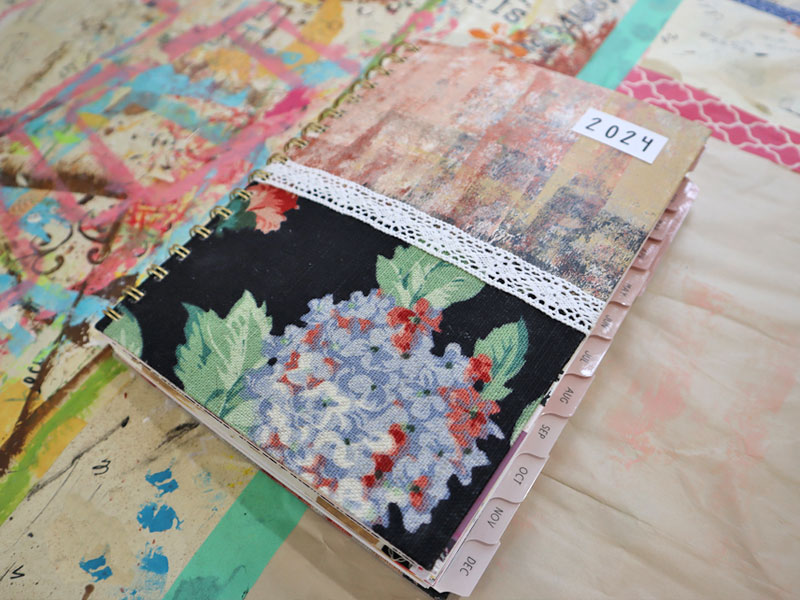
I discovered the perfect planner for me at Target. You can explore the 2024 version here. While I didn’t document the original process, here I’ll explain the changes I made and show you how I’m reusing the custom elements from last year. The alterations I made include:
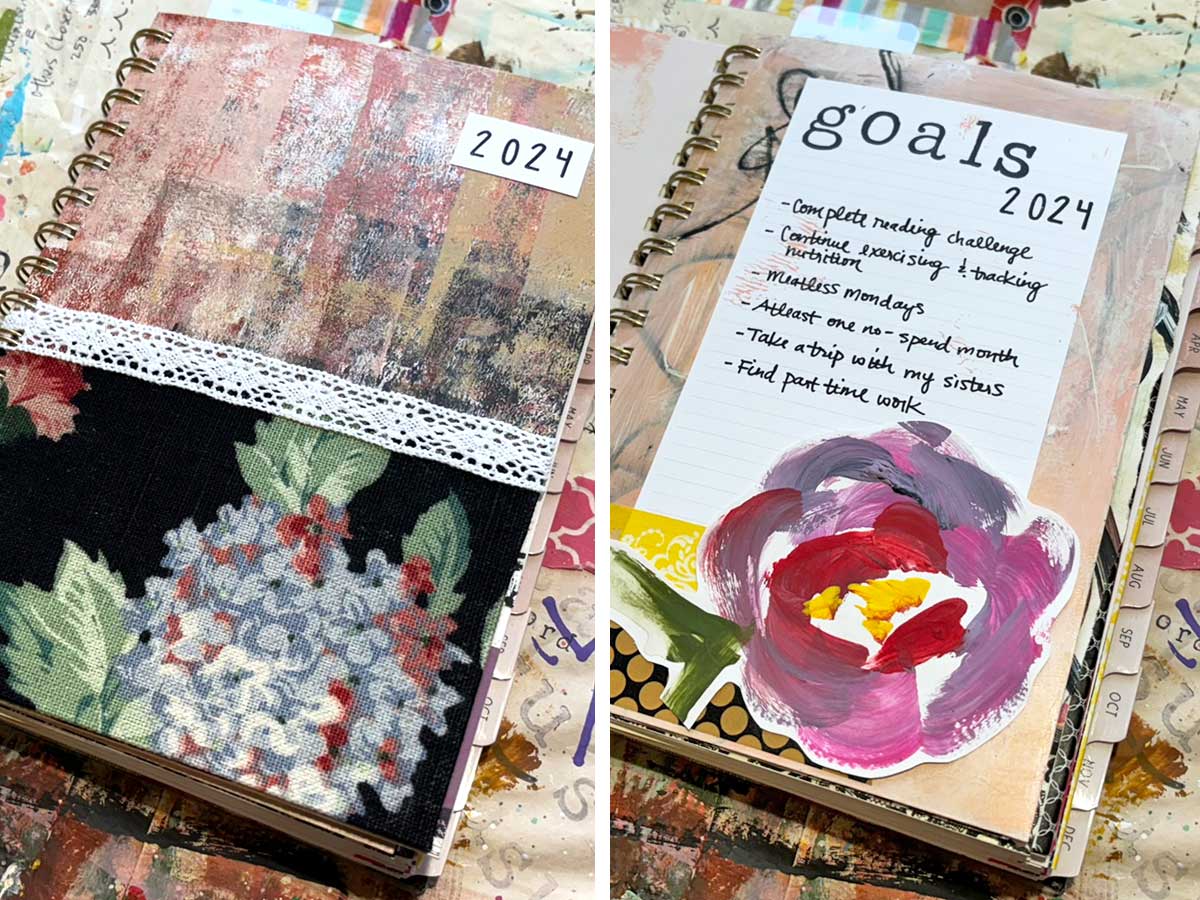
Replacing the cover with my own design
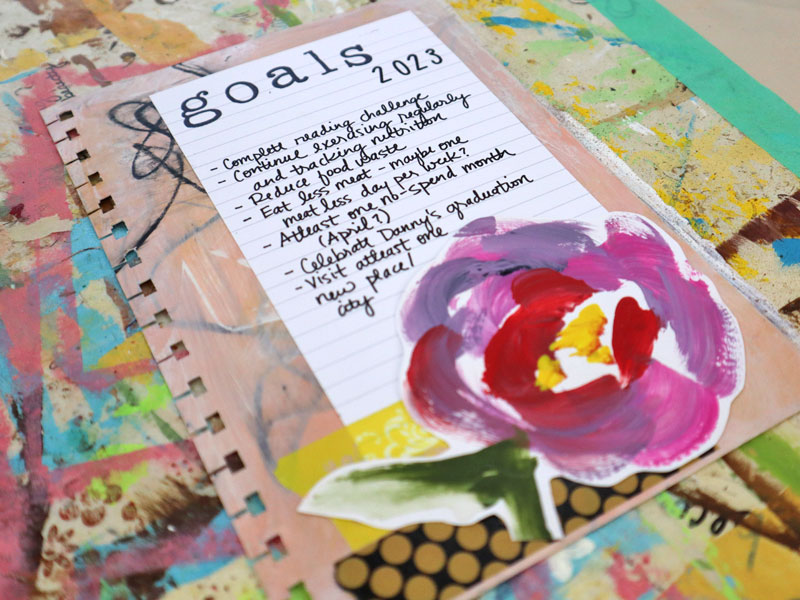
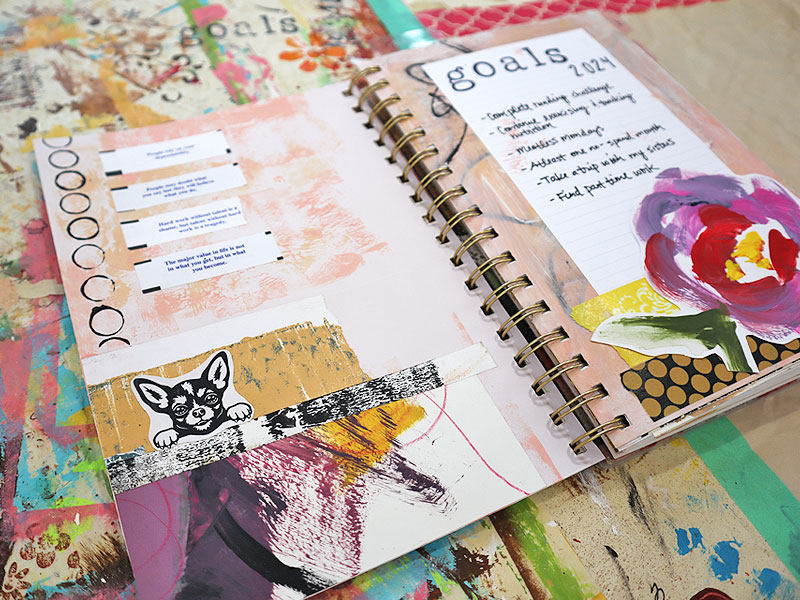
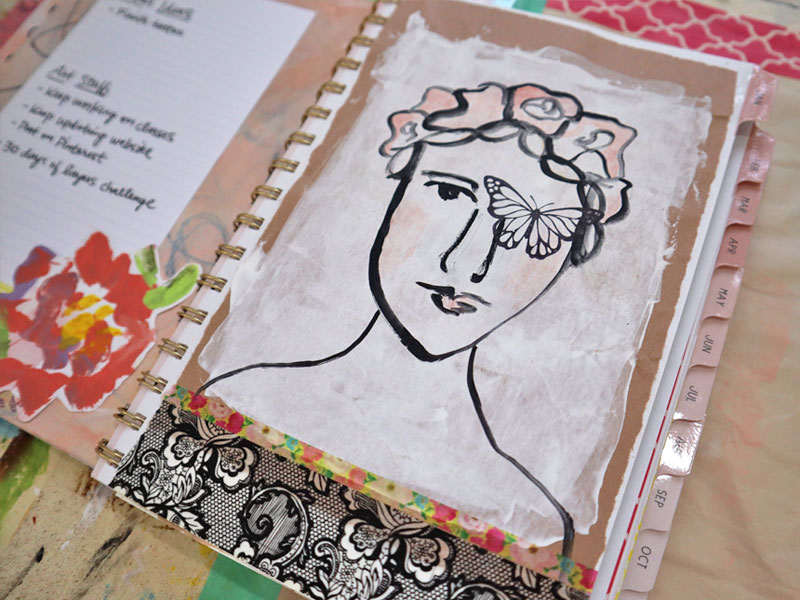
Adding custom pages for my annual reading challenge, goals, and frequently made recipes
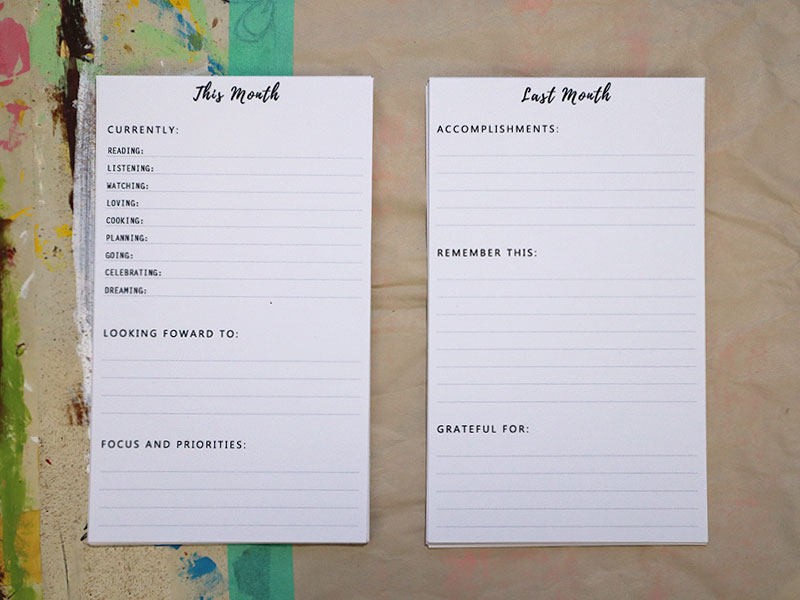
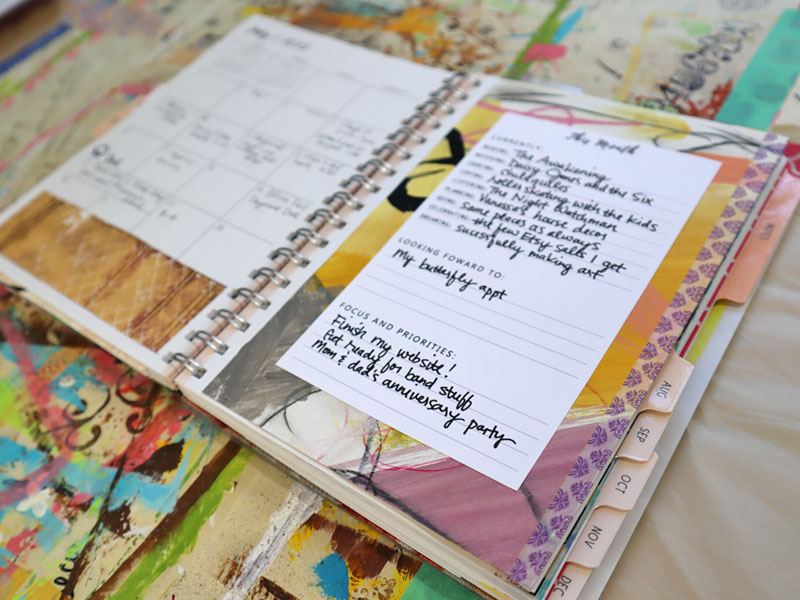
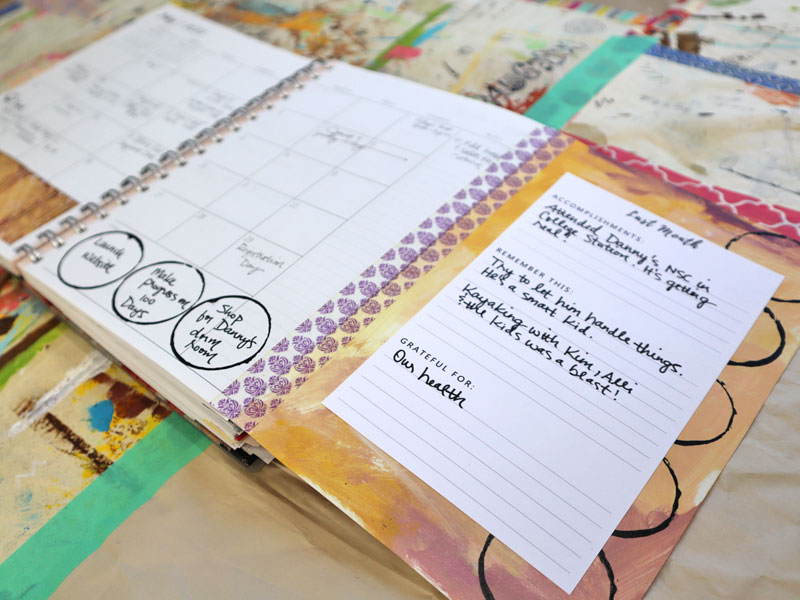
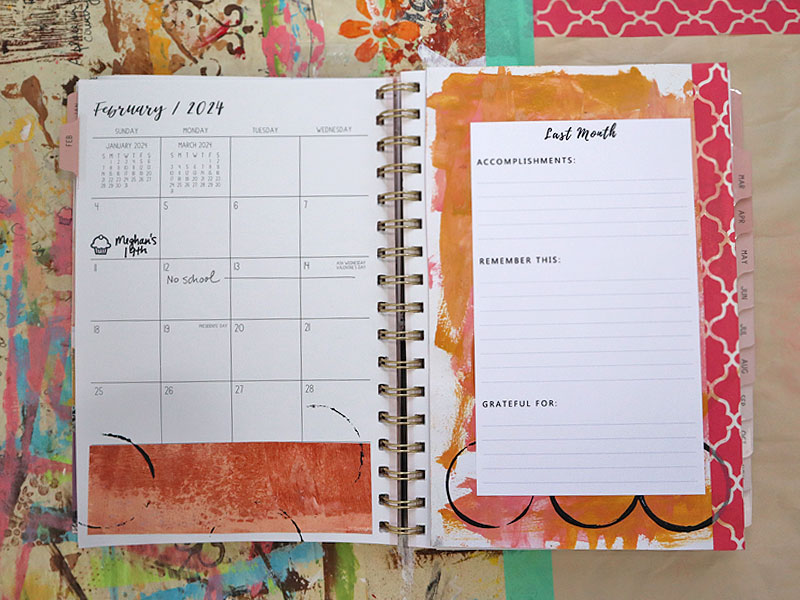
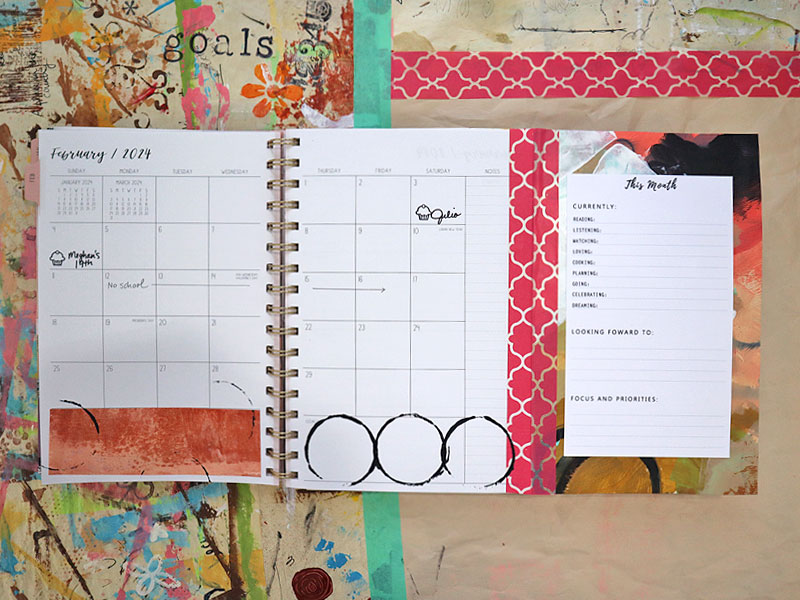
Adding a tip- or fold-in page of prompts to each monthly calendar – one side to reflect on the previous month, the other to document plans and a focus for the upcoming month
Adding some paint (stamped circles) for goals and painted paper for color to each month
There are endless ways to decorate your planner so that you have a beautiful reminder of your creativity every day. Adding the fold-in pages is an especially easy modification that I highly recommend.
Creating custom elements
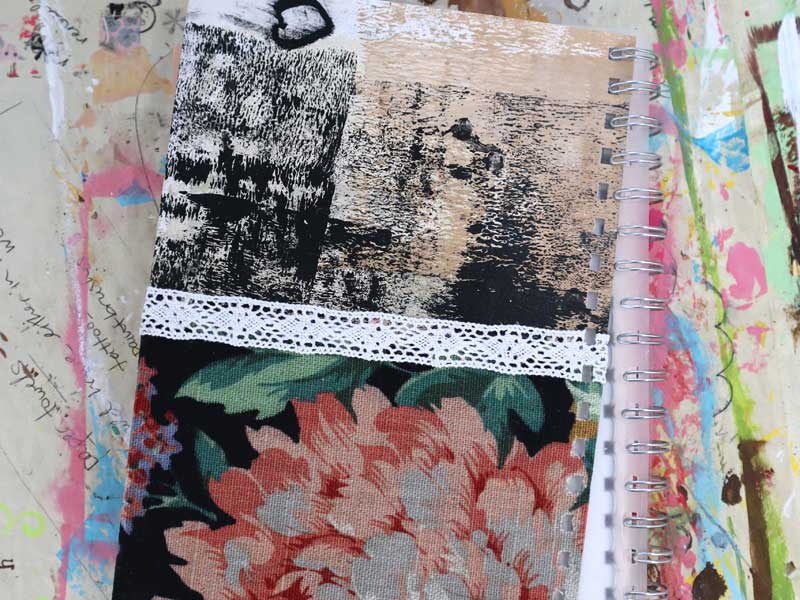
Personalized cover design
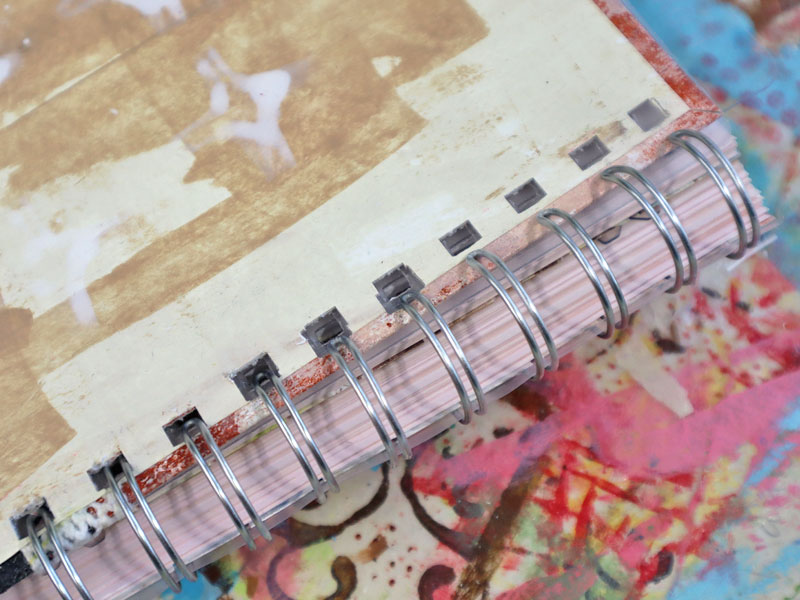
Remove the original cover. For a spiral bound planner, this requires rotating the current cover around to the open side of the wire binding and very gently lifting each metal prong up while pulling the cover out. For a disc-bound planner, you can easily pull the cover off of the plastic discs.
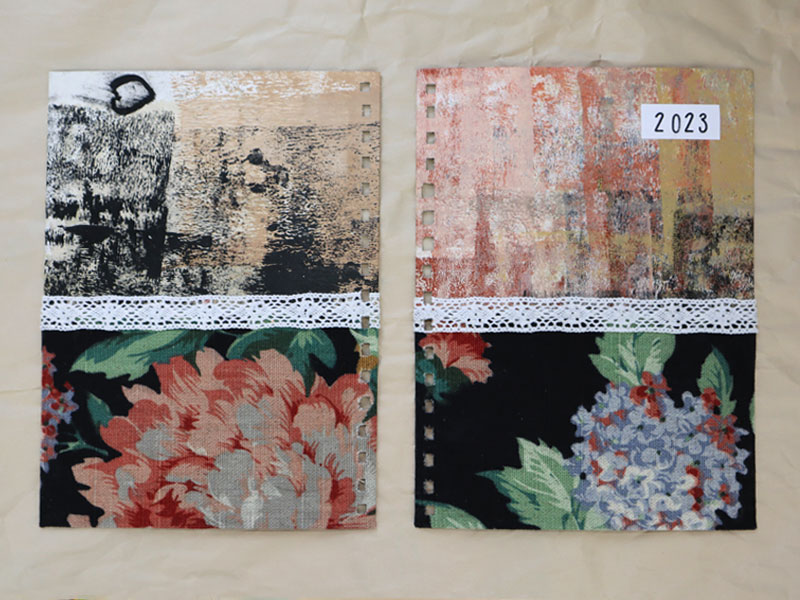
Create the front and back of your new cover by cutting down a cereal box or other sturdy material to the size of the original cover. Decorate it in whatever way pleases you! I used a floral fabric, my own hand-painted paper, and a crocheted ribbon applied with one of my favorite cheap adhesives, Paper Mod Podge.
Punch the holes for binding. One option is to use the original cover to trace the holes onto your new cover and punch them out with a handheld punch. You could also use a punch designed especially for disc-bound planners, or the Zutter Bind-It-All.
If using the Zutter, I recommend testing it out on some copy paper cut to the size of your cover to make sure the margins are correct and the holes line up with the original cover. You may still need to use a handheld punch for the holes at the outer-most edges.
Install your beautiful new cover in the same way you took the original one off – by very gently lifting each metal prong, pushing in the new cover and sliding the prongs into the holes of the new cover (for spiral bound), or by simply sliding it onto the plastic discs (for disc-bound).
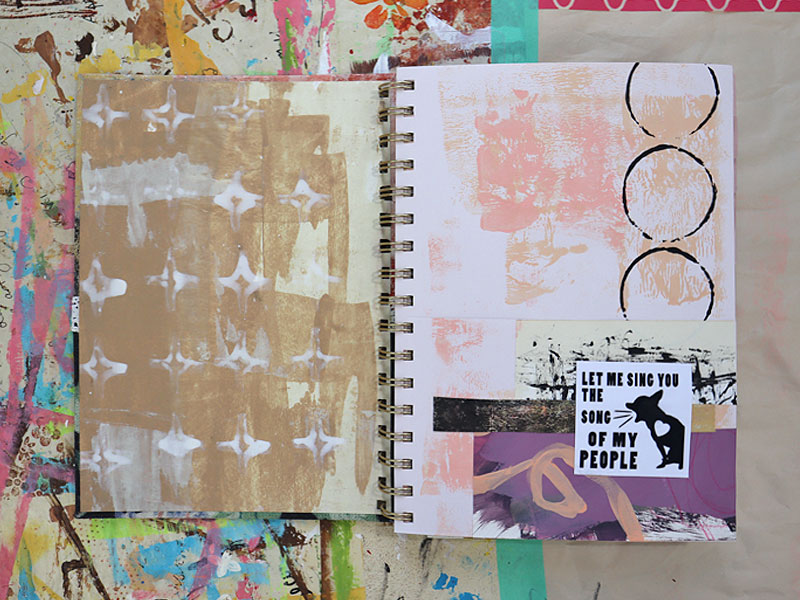
Additional custom pages
Create the base pages from cardstock, watercolor paper, or any other thicker paper cut to the size of the interior planner pages. This is typically the same height as the cover but a half inch shorter on the width.
Decorate them with paint, collage, embellishments, stickers – the options are endless!
Add any custom templates, fill in the blank prompts, or journaling pages.
Here’s a tip!!! If you print your pages at home, a great paper to try is the HP HeavyWeight Project Paper (matte, 40 lb). This is really nice paper for when you want to print on something thicker than regular copy paper but not as stiff as card stock.
Punch the holes for binding in the same way as for the cover. Also cut a small slit from the outer edge of the paper to the center of each hole using small scissors. This makes it possible to slip the page over the wire binding at any location in the planner.
Fold-in monthly pages and a favorite art making technique
The fold-in monthly pages are where you can really use your custom artwork or papers to add your desired colors and artistic flair!
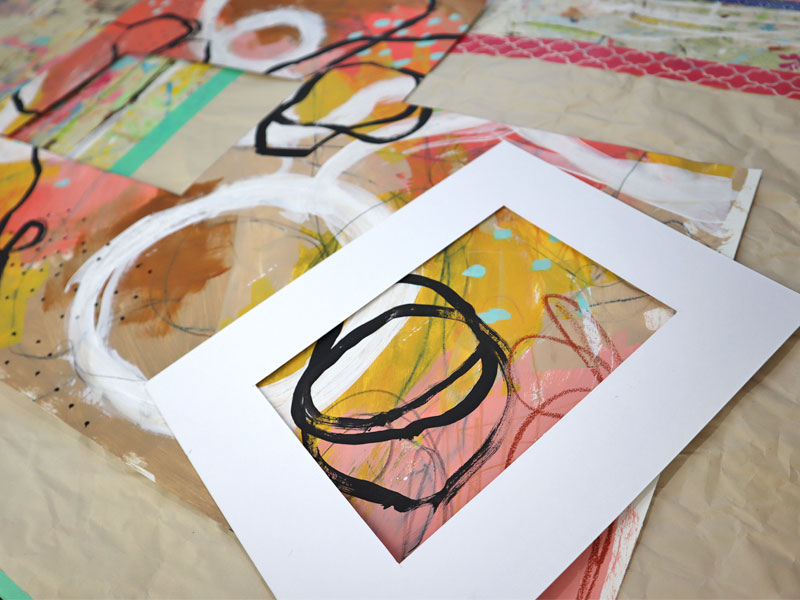
I started by creating multiple large abstract paintings using various color schemes, painting, and mark making techniques. The real magic is in this technique – create a simple mat using a plain sheet of paper with the mat opening cut to the size of the desired planner page, then move the mat around each of the larger pieces to isolate and cut out sections that you find pleasing.
It’s amazing! The large painting may look random and not very cohesive, but you can pull smaller sections out of the bigger painting that you love. Those smaller sections would be impossible to create on their own. This is one of my favorite techniques for making art! I did this twelve times to have a page for each monthly calendar.
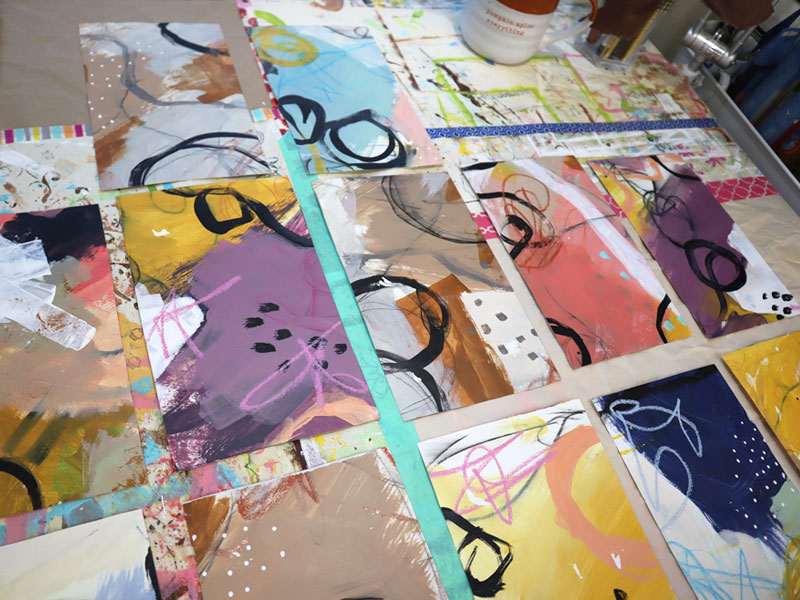
Gather together your twelve pieces of art or patterned paper trimmed to the size of the interior planner pages. Make sure both sides are decorated.
Attach custom planning or journaling templates to the base art pages. I custom designed my templates in Photoshop and printed them at home. If you’d like copies of the files, just send me an email!
Here’s a tip!!! If you plan on reusing your base painting pages next year, be sure to use a non-permanent adhesive when attaching the custom templates like this removeable double sided tape.
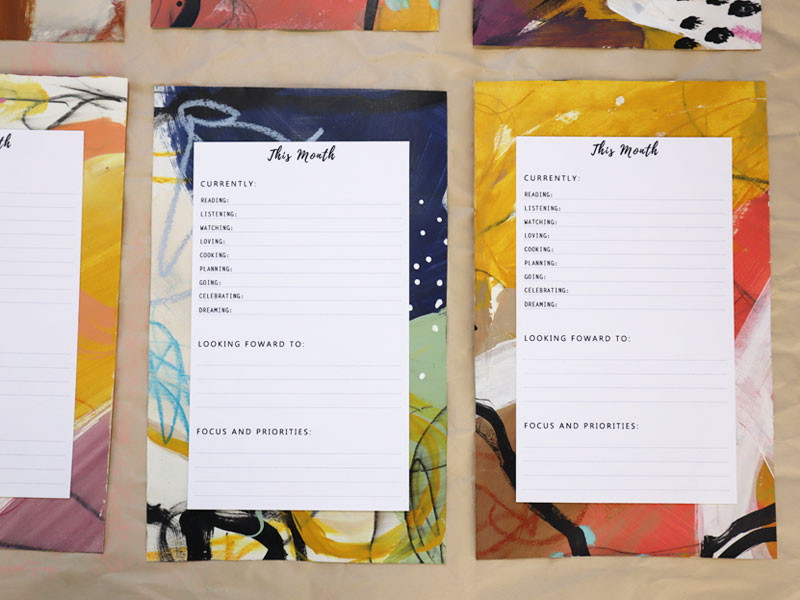
For each month, line up the edge of the base painting page to the edge of the calendar page and apply a long strip of washi tape to each side.
The new page can then be folded at the washi tape seam so that it lays either on top of or behind the calendar page.
Reusing custom elements year to year
You can reuse both the custom full pages and fold-in style pages to decorate your planner in the new year!
Print and trim down new blank versions of any custom fill in the blank templates.
Remove the old templates from the painting pages and attach new blank ones, then remove painting pages from the calendar pages by removing the washi tape.
Carefully remove any other custom pages from the planner binding.
Install everything in the new planner in the same method as before.
Add any other decoration you’d like using paint, paper or stickers to monthly or weekly pages. I stamped circles in black paint on the monthly pages using another favorite tool – an empty toilet paper roll! I use them to write in specific goals for the month.
Here is my finished 2024 planner!
Our goals can only be reached through a vehicle of a plan, in which we must feverently believe, and upon which we must vigorously act.
There is no other route to success.
— Pablo Picasso
Supplies Used
Here is a summary with links to the major supplies I described as well as some of my other favorite planning related tools. These are all products I use and love. If you’d like a copy of any of the printable pages I designed, just email me and I’ll send them over.
I love being able to look back to see what I was working on, thinking about, and feeling throughout the year, both the good and the bad. It helps me realize what I’ve accomplished and identify what might not be working, along with patterns in my mood and motivation.
I hope this post has given you some ideas for how you can decorate your planner and use it for more than just the daily tasks. I’d love to hear about any techniques you use in your planning – let me know in the comments! ♡